
Payroll Support Document
Open as: PDF or Word Document
R. Reports Menu: O. Process W2s
A note for Printing W-2s
- Selecting to print will prompt you to prepare your printer with forms.
- The first two forms that print are actual W-2's but they are used for an alignment test. After the printing of these first two forms you will beprompted whether you want to continue printing or adjust alignment using the row and column offset (see below). If you select to adjust the alignment you will again print the first two forms and you will be prompted again. This may be repeated as many times as needed (keep in mind that you will use up 2 more W-2s each time you do this. When the alignment is correct, and you click continue, the printing will begin at the third employee.
Table of Contents
"W-2 File For submission to the SSA" Format
Employer/Entity Specific Information
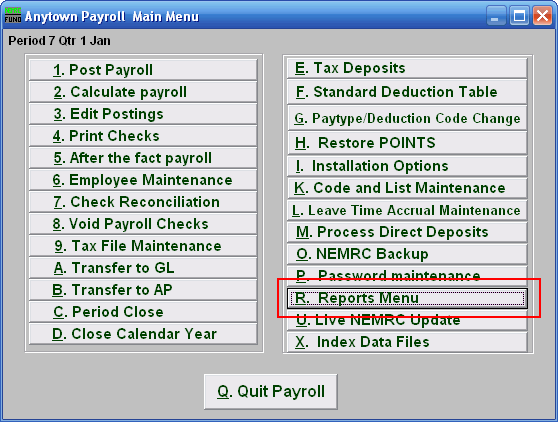
Click on "R. Reports Menu" from the Main Menu and the following window will appear:
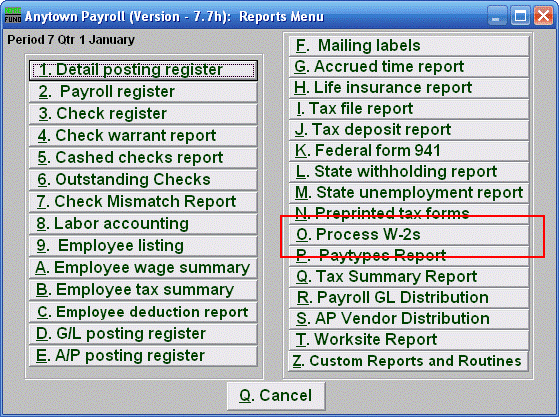
Click on "O. Process W-2s" from the Reports Menu and the following window will appear:
Process W2s
When you click on "O. Process W2s," the following notice will appear:
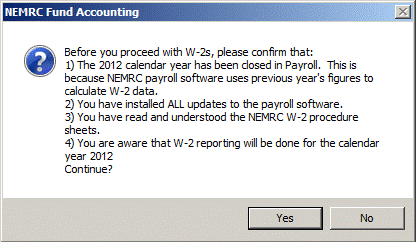
Please read the above carefully. When ready to continue, click "Yes."

If this notice appears, you may not have closed the year. If the issue persists, please call support at 1-800-387-1110.
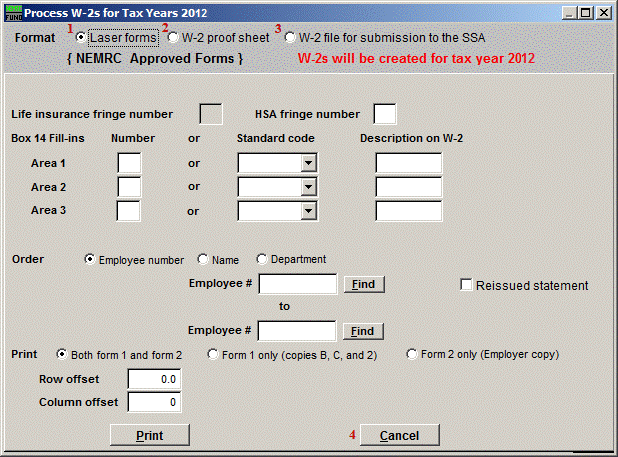
- Laser: Select this format if you are using laser forms.
- W-2 Proof Sheet: Select this format to print on plain paper to review information.
- W-2 file for submission to the SSA: Select this format to create the actual file for submission to the SSA.
- Cancel: Click "Cancel" to return to the Reports Menu.
Refer to the section below that relates to your choice.
"Laser" Format
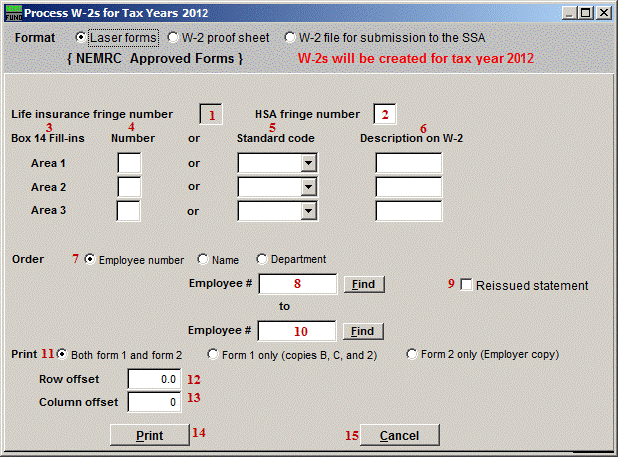
- Life Insurance Fringe Number: If you have any employee(s) with a life insurance value that exceeds $50,000 then a fringe must be used to record the premium value that covers the benefit value greater than the $50,000.
- HSA Fringe Number: If there is an employer contribution to the employees Health Saving Account then enter the fringe number that reports the value of that contribution. This is a required reportable amount.
- Box 14 Fill-ins: The W-2 allows for 3 entries into Box 14. Due to space constraints on the actual W-2 you are only allowed 3 entries.
- Number: Enter the deduction number(1-9,A-Z) OR the standard deduction code.
- Standard Code: Enter the deduction number(1-9,A-Z) OR the standard deduction code.
- Description on W-2: Enter the description to appear for that deduction on the W-2.
- Order: Click on the order that you wish for the W-2s to print (Employee number, Name, or Department).
- Employee #: Enter the Employee # that you wish to start with. For more information on Employee lookups, refer to PR GENERAL EMPLOYEE LOOKUPS.
- Reissued Statement: Check this box to have the software mark the W-2 as a reissue.
- Employee #: Enter the Employee # that you wish to end with. For more information on Employee lookups, refer to PR GENERAL EMPLOYEE LOOKUPS.
- Print: Click to choose if you will print both Form 1 and Form 2 (you will print all of Form 1 and then be prompted to put Form 2 in the tray) OR just Form 1 OR just Form 2.
- Row Offset: Use this to adjust the up or down position of the print, you will be given the option to adjust the offset after the first two W-2s have been printed. If you do, you will re-print the first two W-2s. This may be repeated as many times as needed.
- Column Offset: Use this to adjust the left or right position of the print, you will be given the option to adjust the offset after the first two W-2s have been printed. If you do, you will re-print the first two W-2s. This may be repeated as many times as needed.
- Print: Click "Print" to print the W-2s. Keep in mind the notice at the top of this document. For more information on printing in general, refer to GENERAL PRINTING.
- Cancel: Click "Cancel" to return to the Reports Menu.
"W-2 Proof Sheet" Format
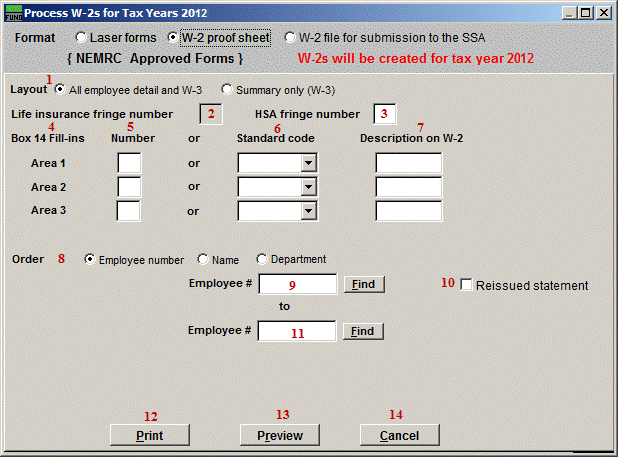
- Layout: Choose to report all employee detail with the total page or just the total page.
- Life Insurance Fringe Number: If you have any employee(s) with a life insurance value that exceeds $50,000 then a fringe must be used to record the premium value that covers the benefit value greater than the $50,000.
- HSA Fringe Number: If there is an employer contribution to the employees Health Saving Account then enter the fringe number that reports the value of that contribution. This is a required reportable amount.
- Box 14 Fill-ins: The W-2 allows for 3 entries into Box 14. Due to space constraints on the actual W-2 you are only allowed 3 entries.
- Number: Enter the deduction number(1-9,A-Z) OR the standard deduction code.
- Standard Code: Enter the deduction number(1-9,A-Z) OR the standard deduction code.
- Description on W-2: Enter the description to appear for that deduction on the W-2.
- Order: Click on the order that you wish for the W-2s to print (Employee number, Name, or Department).
- Employee #: Enter the Employee # that you wish to start with. For more information on Employee lookups, refer to PR GENERAL EMPLOYEE LOOKUPS.
- Reissued Statement: Check this box to have the software mark the W-2 as a reissue.
- Employee #: Enter the Employee # that you wish to end with. For more information on Employee lookups, refer to PR GENERAL EMPLOYEE LOOKUPS.
- Print: Click "Print" to print the W-2s. Keep in mind the notice at the top of this document. For more information on printing in general, refer to GENERAL PRINTING.
- Preview: Click this button to preview this report. Refer to GENERAL PREVIEW for more information.
- Cancel: Click "Cancel" to return to the Reports Menu.
"W-2 File For submission to the SSA" Format
File Header Information
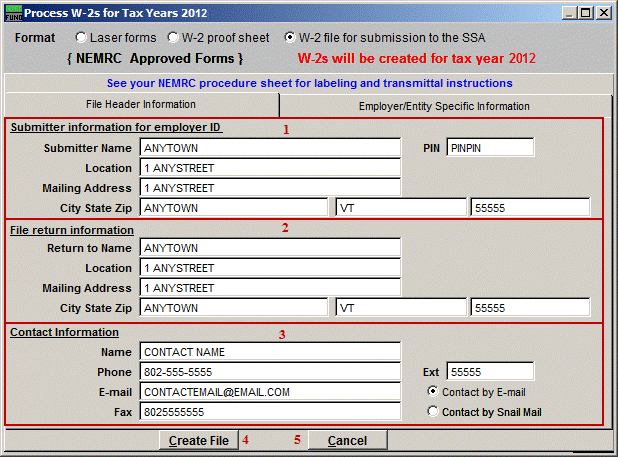
- Submitter Information for Employer ID: Enter the Entities name and address along with the BSO pin number assigned to you as an individual.
- File Return Information: Enter the mailing address from returning information on this filing. Usually it is identical to item 1.
- Contact Information: Enter your specific contact information as the submitter of the file.
- Create File: Click "Create File" to create the W-2 file for SSA submission. For more information on printing in general, refer to GENERAL FILE. After clicking "Create File" refer to the "Outputting Your SSA file" section below.
- Cancel: Click "Cancel" to return to the Reports Menu.
Employer/Entity Specific Information
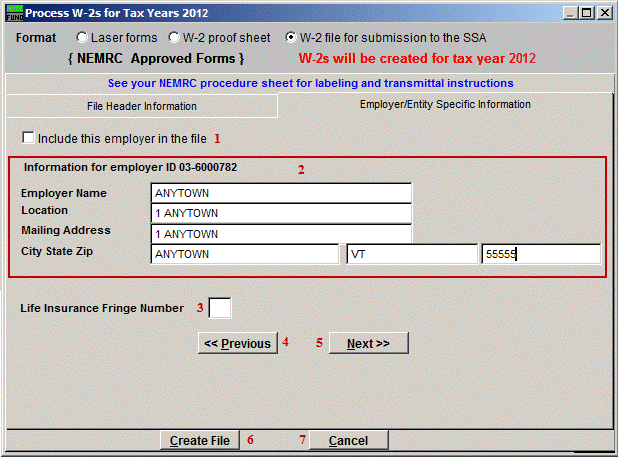
- Include this Employer in the File: Check this box to include this Employer in the W-2 File.
- Information for Employer ID ##-#######: This is the Federal Taxpayer ID found in installation.
- Life Insurance Fringe Number: If you have any employee(s) with a life insurance value that exceeds $50,000 then a fringe must be used to record the premium value that covers the benefit value greater than the $50,000.
- <<Previous: Click this button to view the entity information available for the next lower entity number.
- Next>>: Click this button to view the entity information available for the next higher entity number.
- Create File: Click "Create File" to create the W-2 file for SSA submission. For more information on printing in general, refer to GENERAL FILE. After clicking "Create File" refer to the "Outputting Your SSA file" section below.
- Cancel: Click "Cancel" to return to the Reports Menu.
Outputting Your SSA File
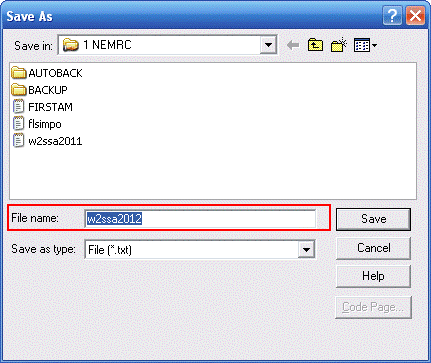
It is VERY IMPORTANT that you save the File as "w2ssa2012" and REMEMBER where you save it. Click the "Save" button to save this file.

You will see the above notice when NEMRC successfully saved the file.
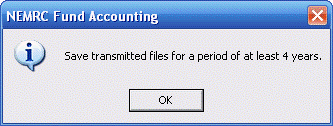
The above notice is to remind you to keep this file for at least four years.